
In today’s digital world, managing multiple identities online is crucial for marketers, developers, eCommerce sellers, and privacy-conscious users. However, it’s also slightly complex to do it correctly. This is where BitBrowser comes in which simplifies this process and makes it very seamless.
What is BitBrowser?
BitBrowser is a powerful anti-detect browser designed to help users manage multiple browser profiles while keeping each identity isolated and secure. Whether you’re running multiple social media accounts, managing ad campaigns, or testing websites, it provides a structured and safe environment to do so.
Think of it as a more advanced version of using multiple browsers or incognito tabs or even multiple physical devices, but with additional control over fingerprints and automation. The configuration can act as if you are using multiple physical devices without the need of actually buying them.
In other words, BitBrowser is a multi-profile anti-detect browser that allows you to create and manage multiple independent browser environments. Each profile behaves like a completely separate device with its own:
- IP Address (via proxy)
- Cookies and Cache
- Browser Fingerprint (OS, resolution, user agent, etc.)
- Login Sessions
This means websites treat each profile as a different real user, reducing the risk of bans or detection.
Why Do We Need BitBrowser?
There are multiple reasons or uses of using BitBrowser. Some of them are as follows:
1. Manage Multiple Accounts Safely
Platforms like Facebook, Instagram, Amazon, or Google often restrict multiple accounts from the same device. BitBrowser lets you run them without overlap or detection.
2. Avoid Account Bans
Using the same browser fingerprint across accounts can trigger security systems. BitBrowser isolates each account thereby minimizing risk.
3. Digital Marketing & Ads
Using BitBrowser, marketers can manage multiple ad accounts, test campaigns from different locations and avoid cross-account tracking.
4. eCommerce & Dropshipping
Sellers can operate multiple stores or accounts without linking them together.
5. Web Scraping & Automation
Developers can simulate different users and environments for testing or scraping purposes.
6. Privacy & Anonymity
Each session can be configured with different fingerprints and proxies, helping maintain anonymity online.
How to set up a profile on BitBrowser?
You can install BitBrowser on your Windows or Mac devices and then create a profile to complete the set up. It is a straightforward process but let’s go over the steps briefly.
You start by installing the BitBrowser application on your computer. Go to BitBrowser website, select Download and then select the version applicable for your system.
After installation, you can open the application and run through the installation process. If an account is asked to be created, please create one and login with your account credentials.
After that, you can start setting up a profile. Think of a profile like an “online identity”. The accounts that belong to one identity and you don’t mind platforms linking them together using their algorithms, can all go under one profile. If the accounts belong to a different identity, you should create multiple profiles.
You may have to repeat these steps for creating a profile therefore let’s go over them in a little bit more detail:
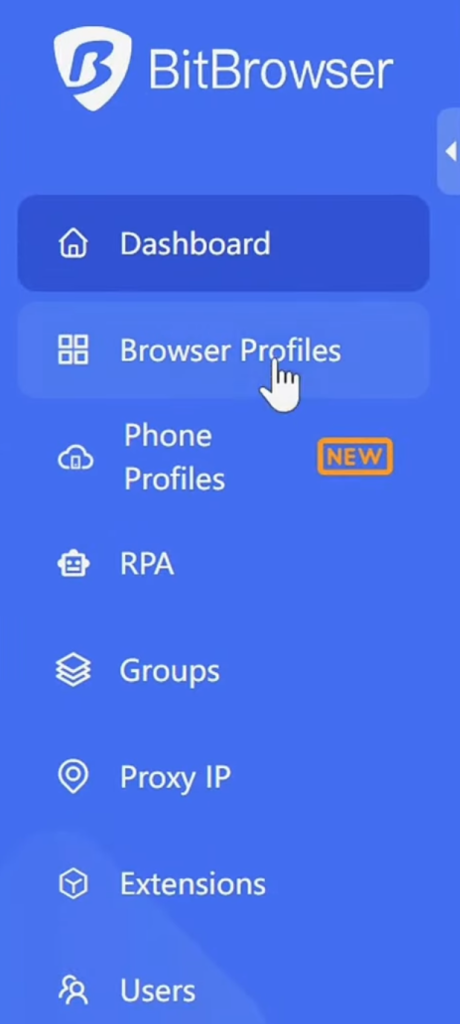
Step 1. Click on Browser Profiles
After opening the application, click on the “Browser Profiles” on the top left:
Step 2. Click on Add Button
Click on the Add Button to create a profile.
Step 3. Enter the configuration information
You can randomise the fingerprint information or add all of the fields manually. Or add the ones you think are important manually and randomise the rest. Let’s go over the frequently used configuration settings.
First is the basic information section.

It asks for information such as Name, Group, Platform, Username, Password, Duplicate Validation, Multi-open settings, 2FA Key. The fields may re-arrange or change in the future.
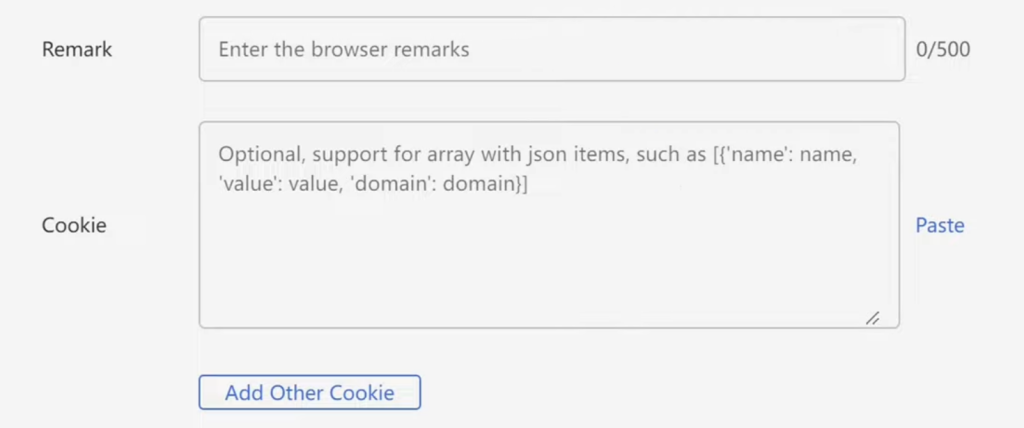
It also asks for any private comments (Remarks) and additional cookies configuration.
Step 4. Enter proxy information
This is the part where you enter the proxies you would like to use. Of course, this is optional but very crucial if you really want to keep the accounts distinguished between one another.
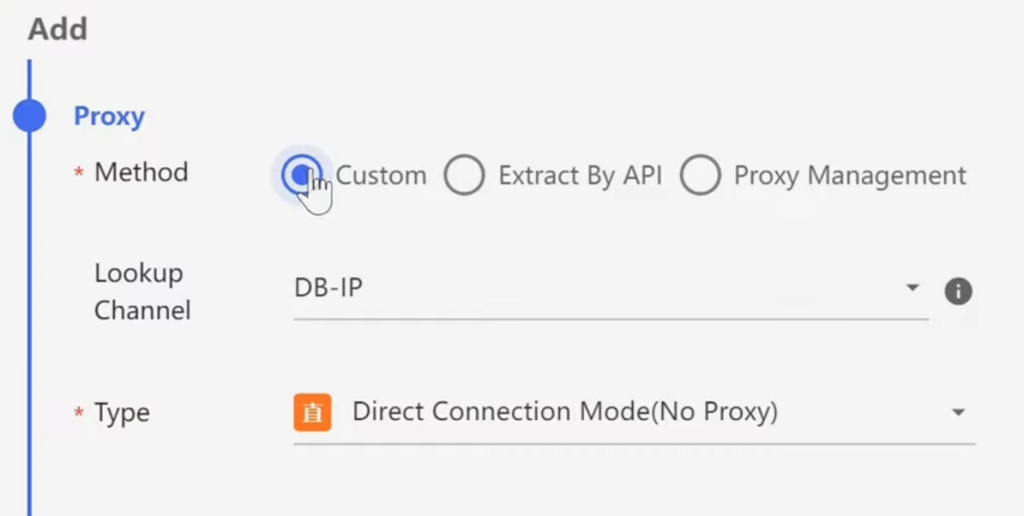
The Lookup channel is the IP Database BitBrowser will use to determine the location of your IP or your proxy IP. This location may later be used for best randomising other fingerprints (such as timezone, etc.). I chose IP2Location here for illustration.
The Type field is the way BitBrowser will connect to the proxy (not applicable if no proxy would be used). Choosing “Direct Connection Mode” here means there is no proxy being used. Once you click on this dropdown, it shows you multiple protocols. Depending on your proxy provider, you may choose the applicable proxy protocol. For example, at ProxySwag we offer HTTP and SOCKS5 protocols for our Static Residential ISP Proxies, so you can choose any one of them. Typically we’ve seen SOCKS5 perform better, but it’s totally your choice.
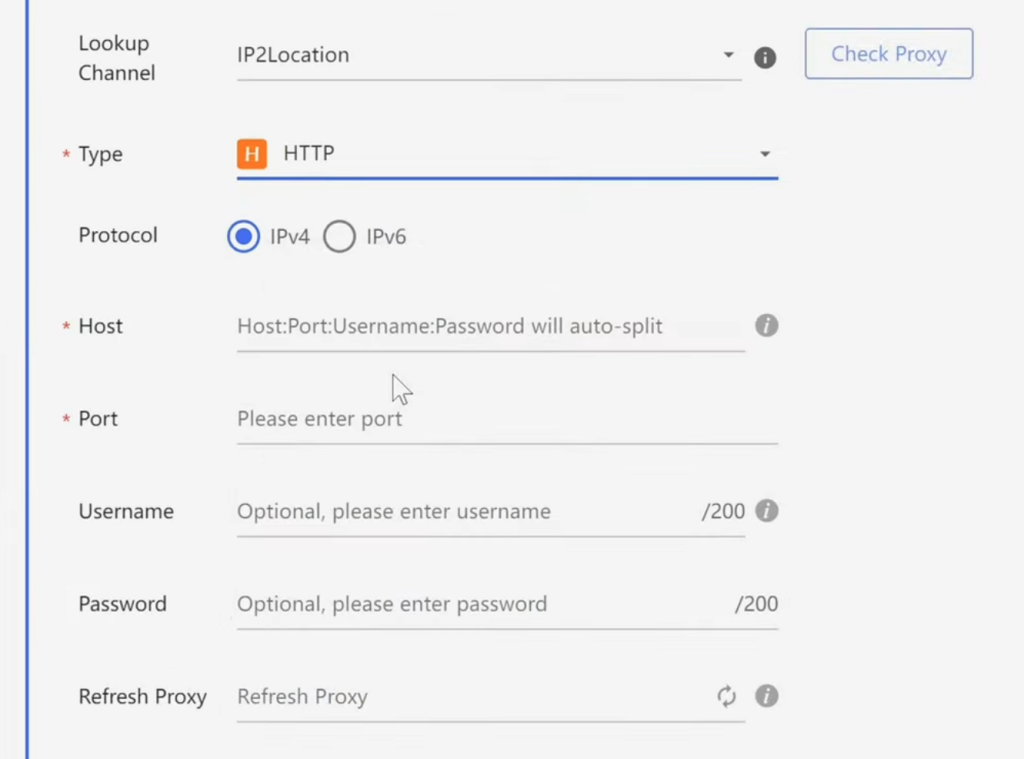
For this article, let’s select HTTP protocol. Now, the application will ask you for your proxy credentials. You can use your proxy provider’s dashboard for the credentials and enter them as applicable.
The username and password for the proxy fields is optional. If you choose IP Whitelisting, you can leave these as empty. Apart from that, it asks for a refresh proxy field, which is required if the proxy has to be replaced in the middle of the usage. We typically do not recommend this for most use cases but you can ask your provider how to set this up.
Step 5. Fingerprint Information
After you scroll down, you would see the fingerprint information such as Browser (Chrome or Firefox), Kernel Version, Device, Operating System (OS), OS Version, Browser Version, User Agent, Language, Timezone, WebRTC, Screen Resolution, Window Size, etc. As you would’ve guessed by now, there are so many fields to configure that you would probably end up using the Random Fingerprint option or leave them the default way.
Step 6. Save and Launch Profile
You can click the Confirm or Save button after filling up the required information. Go back to the profile list and then click Open. A new browser window will now run through the configured proxy and your fingerprint information.
Step 7. Verify IP & Location
After launching, you can visit an IP-checking website such as iplocation.net and confirm if the location of the IP shown matches what your proxy provider gave you. Make sure it’s correct, as inconsistencies may lead to suspicions and may raise manual reviews for your accounts.
You may also go to specialised websites such as ipleak.net and confirm your fingerprint information (OS, User Agent, Browser and OS Version, timezone, etc.).
If everything looks correct, you can be assured your setup is working properly. You can now proceed to work on your use case.
Conclusion
In this article, we explored what BitBrowser is, why we need it and how to use it step by step. I explained that it is a multi-profile browser designed to create separate, isolated browsing environments, each with its own cookies, fingerprint, and proxy settings.
I also covered its configuration process. These features make it a structured solution for managing multiple online identities efficiently.
Finally, we looked at common use cases such as digital marketing, affiliate campaigns, e-commerce management, ad verification, automation, and software testing.
Overall, BitBrowser is built for professionals and businesses that need secure, scalable, and organized management of multiple online accounts which goes far beyond what standard incognito mode can offer.
Next Step
Setting up BitBrowser is the first step to creating separate identities on the internet. However, only creating separate profiles is just like having multiple browsers where the accounts aren’t linked together through fingerprints or cookies.
Platforms can still track you using your IP Address and can associate your accounts as one using their smartly developed algorithms. The problem with this is, if one account is terminated, others are at risk too.
To create true separate digital identities, you also need to configure ISP Proxies which provide you a unique IP Address making it harder for the platform to associate accounts together and you can maintain separate identities.
Using Static Residential ISP Proxies are the best for running long-term and stable tasks such as social media accounts management, web scraping, price monitoring, ad verifications and much more.
Looking to buy Premium Quality Static Residential ISP Proxies? Try ProxySwag which on an average saves up to 31% of the proxies cost.